Create your own Autocomplete using Vue.js
Jun 18, 2016
Note: This article is using Vue.js 1.0. If you are planning to use Vue.js 2, go to this article
From the days of jQuery, I have been pulling in different plugins everytime I wanted to create an Autocomplete input. Later Bootstrap came with an Typeahead component and then they removed it from Bootstrap 3 and I was forced to use typeahead.js when I was developing Encollege
When I moved to Vue.js, I realized how much it gave me the power of creating my own UI Component with a lot less effort. It made me decide to think a lot before pulling in a dependency just for an UI Component. Whenever possible I write my own component using Vue.js quickly and it gives a me a lot of freedom and control. Developing a simple component in Vue.js hardly takes the time which you spend reading the documentation of an external dependency.
So here we will see how to create a quick Autocomplete component with Vue.js.
Let’s utilize the Vue CLI tools to quickly jump start developing Vue.js components. I generally use this to prototype components quickly before adding them to the projects.
If you haven’t installed Vue CLI tools run npm install -g vue-cli and then
run vue init browserify-simple autocomplete
We are going to use the Bootstrap for styling and so make sure you link the CSS
file of Bootstrap to the index.html. Your index.html should look like this.
<!DOCTYPE html>
<html lang="en">
  <head>
    <meta charset="utf-8">
    <link rel="stylesheet"
       href="https://maxcdn.bootstrapcdn.com/bootstrap/3.3.6/css/bootstrap.min.css"
    >
    <title>autocomplete</title>
  </head>
  <body>
    <!--To be coded -->
    <script src="dist/build.js"></script>
  </body>
</html>
Now go to the src folder and create a file name Autocomplete.vue
First lets decide how our component should look from the usage point of view.
<autocomplete :suggestions="cities" :selection.sync="value"></autocomplete>
We need two properties here. suggestions is an array you pass to the component
which will be used for showing autocomplete suggestions and selection is the
final value which was given in the input by the user. .sync has to be added to
two-way bound elements to make sure it syncs whenever there is change in parent
& child components.
Time to create the script section of the Vue file.
<script>
import Vue from 'vue';

export default {

    props: {
        suggestions: {
            type: Array,
            required: true
        },

        selection: {
            type: String,
            required: true,
            twoWay: true
        }
    }

    /**
     * More to come here
     */
}

</script>
The selection property should be two-way binding because it have to update
a value in the parent component which is bound to the selection property.
Lets define the template for the component in Autocomplete.vue file.
<div style="position:relative" v-bind:class="{'open':openSuggestion}">
    <input class="form-control" type="text" v-model="selection"/>
    <ul class="dropdown-menu" style="width:100%">
        <li v-for="suggestion in matches">
            <a href="#">{{ suggestion }}</a>
        </li>
    </ul>
</div>
Now we have the template and component object. It gives us the basic structure of the component. Half of our work is already done. What we still need to do is to add filtering logic and wiring of events like, When suggestions should appear, What should happen if I select a suggestion etc.
In the template we have mentioned something named matches in v-for.
matches should be an array of suggestions matching the current input. This is
a good fit for Computed Property. Computed properties are more like watch
function in Angular.js. It will compute the matching suggestions based on the
input whenever the input changes automatically.
And we need one more computed property named openSuggestion which will be used
to add the open class to make the suggestions dropdown visible and invisible
according to the context.
So lets add the Computed Property to the component (to the vue file on the More to come part)
data: {
    return() {
        open: false,
        current: 0
    }
},

computed: {

    //Filtering the suggestion based on the input
    matches() {
        return this.suggestions.filter((str) => {
            return str.indexOf(this.selection) >= 0;
        });
    },

    //The flag
    openSuggestion() {
        return this.selection !== "" &&
               this.matches.length != 0 &&
               this.open === true;
    }
}
Now you can test what we have done so far using npm run dev (assuming you
would have done npm install). We have already achieved displaying the
suggestions. What is remaining yet is to handle the events to select the
suggestion.
We need to handle these five events
- Pressing Down arrow
- Pressing Up arrow
- Clicking a suggestion
- Pressing Enter on a suggestion
- Changing the input
In the process we also need to update the class to highlight active
suggestion.
Lets update the template to add these five events.
<div style="position:relative" v-bind:class="{'open':openSuggestion}">
    <input class="form-control" type="text" v-model="selection"
        @keydown.enter = 'enter'
        @keydown.down = 'down'
        @keydown.up = 'up'
        @input = 'change'
    />
    <ul class="dropdown-menu" style="width:100%">
        <li v-for="suggestion in matches"
            v-bind:class="{'active': isActive($index)}"
            @click="suggestionClick($index)"
        >
            <a href="#">{{ suggestion }}</a>
        </li>
    </ul>
</div>
Now we need to add the methods section to add the handlers for these events.
methods: {
    //When enter pressed on the input
    enter() {
        this.selection = this.matches[this.current];
        this.open = false;
    },

    //When up pressed while suggestions are open
    up() {
        if(this.current > 0)
            this.current--;
    },

    //When up pressed while suggestions are open
    down() {
        if(this.current < this.matches.length - 1)
            this.current++;
    },

    //For highlighting element
    isActive(index) {
        return index === this.current;
    },

    //When the user changes input
    change() {
        if (this.open == false) {
            this.open = true;
            this.current = 0;
        }
    },

    //When one of the suggestion is clicked
    suggestionClick(index) {
        this.selection = this.matches[index];
        this.open = false;
    },
}
Now our Autocomplete component is completely ready!
So lets write the code to use it. In the main.js we are going to use the
Autocomplete component.
import Vue from 'vue';
import Autocomplete from './Autocomplete.vue';

new Vue({
    el: 'body',

    components: { Autocomplete },

    data: {
        cities : [
            'Bangalore','Chennai','Cochin',
            'Delhi','Kolkata','Mumbai'
        ],

        value: ''
    }

});
And in the index.html add the following to the body
<div class="container" style="padding-top:50px;">
    <autocomplete :suggestions="cities" :selection.sync="value"></autocomplete>
</div>
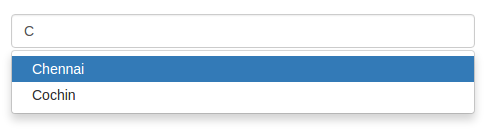
So finally you should see something like this.
Source is available at Github.