Sticky Notes using CSS3 and jQuery
Mar 12, 2013
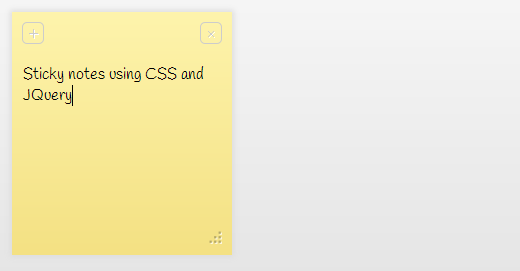
Most of us are good users of Sticky notes application of Windows which is quite a good tool for quick notes to remember. I got inspired by that and tried to create a simple web Sticky Notes using CSS3 and jQuery.

The entire look and feel of Sticky Notes is taken care by CSS3 and creating & deleting notes are done using jQuery.
<body>
<div id="note-space"></div>
<div id="note-template">
<div class="note-head">
<div class="new-button note-head-button">+</div>
<div class="delete-button note-head-button">×</div>
</div>
<textarea></textarea>
</div>
</body>
In the above code note-space is the div in which all notes will be residing where as note-template is just a template which describes the structure of the note and it is not visible. note-template will be cloned whenever we create a new note and placed into note-space.
Make sure you include the font Handlee from Google Webfonts by adding the above code on the head section followed by your CSS file, followed by jQuery, followed by your script file.
<link href='http://fonts.googleapis.com/css?family=Handlee' rel='stylesheet' type='text/css'>
<link rel="stylesheet" href="style.css" />
<script src="http://ajax.googleapis.com/ajax/libs/jquery/1.9.1/jquery.min.js"></script>
<script src="script.js"></script>
Following is the CSS
body {
    background-image: -moz-linear-gradient(top, #f6f6f6 0%, #cccccc 100%);
    background-image: -ms-linear-gradient(top, #f6f6f6 0%, #cccccc 100%);
    background-image: -o-linear-gradient(top, #f6f6f6 0%, #cccccc 100%);
    background-image: -webkit-gradient(linear, left top, left bottom, color-stop(0, #f6f6f6), color-stop(1, #cccccc));
    background-image: -webkit-linear-gradient(top, #f6f6f6 0%, #cccccc 100%);
    background-image: linear-gradient(to bottom, #f6f6f6 0%, #cccccc 100%);
}

#note-template {
    display: none;
}

.note {
    background-color: #FEF4AC;
    background-image: -ms-linear-gradient(top, #FEF4AC 0%, #F4E183 100%);
    background-image: -moz-linear-gradient(top, #FEF4AC 0%, #F4E183 100%);
    background-image: -o-linear-gradient(top, #FEF4AC 0%, #F4E183 100%);
    background-image: -webkit-gradient(linear, left top, left bottom, color-stop(0, #FEF4AC), color-stop(1, #F4E183));
    background-image: -webkit-linear-gradient(top, #FEF4AC 0%, #F4E183 100%);
    background-image: linear-gradient(to bottom, #FEF4AC 0%, #F4E183 100%);
    box-shadow: 0px 0px 5px 2px #dddddd;
    display: inline-block;
    float: left;
    margin-top: 10px;
    margin-right: 10px;
    min-width: 200px;
    min-height: 200px;
}

.note:first-child {
    margin-left: 10px;
}

.note textarea {
    background-color: transparent;
    border: none;
    font-family: 'Handlee', cursive;
    font-size: 16px;
    height: 180px;
    margin: 10px;
    min-width: 200px;
    min-height: 180px;
    padding-top: 10px;
    width: 200px;
}

.note-head {
    padding: 10px;
}

.note-head-button {
    border: solid 1px #cccccc;
    border-radius: 5px;
    color:#cccccc;
    cursor: pointer;
    display: inline-block;
    height: 20px;
    margin: 0px 0px;
    text-align: center;
    text-shadow: 1px 1px #ffffff;
    width: 20px;
}

.note-head-button:hover {
    border: solid 1px #aaaaaa;
    color:#aaaaaa;
}

.new-button {
    float: left;
}

.delete-button {
    float: right;
}
Now when the document loads, the following script executes.
$(document).ready(function() {
    $("body").height($(window).height());
    $("body").delegate(".new-button","click",newNote);
    $("body").delegate(".delete-button","click",deleteNote);
    newNote();
});
In the above code, we delegate the click event of new-button and delete-button to newNote and deleteNote correspondingly. Why didn’t we us click(fn) of jQuery here? The reason is that delegate ensures even newly created new-button and delete-button will be also handling the event which is not the case with click(fn).
It also creates a new note at when the page loads. To create a new note use the following code.
function newNote() {
    var temp = $("#note-template").html();
    $("<div class='note'></div>").html(temp)
                .appendTo("#note-space");
}
And delete a note use the following code.
function deleteNote() {
    $(this).parents(".note").remove();
}
I tried to make this as simple as possible. By working on it more, you can end up in a very good application. For example, the textarea doesn’t grow as you type longer text, instead scroll bar appears which is not a pleasant design. You can try avoiding it using the following API which helps textarea grow automatically.
https://github.com/jaz303/jquery-grab-bag/blob/master/javascripts/jquery.autogrow-textarea.js